Do you want to stay organized without the hassle of switching between multiple tools? If so, embedding Jira into Notion is a great solution. This tutorial will take you through the steps of how to embed Jira in Notion, so you can access your projects and tasks in one place.
For engineering teams, it’s important to stay organized and on top of your tasks. Jira is a popular project management tool used by engineering teams across the world. It enables users to track projects from start to finish. It allows teams to assign tickets to track progress on their engineering sprints in real time.
With its intuitive user interface, Jira has become the go-to tool for many engineering teams who need it to stay organized. Also, due to its open-source nature, there are tons of integrations available that allow you to customize your workflow.
Notion is an all-in-one workspace that helps individuals and teams organize their workflows in one centralized location. It allows users to create documents, manage projects, and collaborate with others within the same space.
Notion also includes features such as reminders, task-tracking tools, calendars, and more that help users stay focused on their work, without getting overwhelmed.
Integrating Jira with Notion offers many benefits for teams such as:
• Streamlined workflows: By combining two powerful tools into one package, teams can streamline their workflow since they don't have to switch back and forth between different tabs.
• Centralized information: With all important data centralized in one place (i.e., Notion), it's easier for teams to find what they need when they need it. Without having to search through many applications or dig through emails sent by other team members to find something specific.
• Increased productivity: Teams can better manage their projects. And communicate better between product, engineering, and marketing teams. Another benefit is that they don't have to worry about juggling many applications at once. Or keep up with different versions of documents scattered throughout many platforms.
In this tutorial, we will show you two ways to embed Jira tickets in your Notion Doc. Ready to get started? Let’s dive in!
Method 1: Using Notion’s built-in Jira integration
The first method we'll cover is the simplest: embed a Jira ticket into a Notion page using Notion’s “Embed” block.
To get started, either type “/embed” or click on the “+” icon at the bottom of your Notion page and select “Embed.” Then click on the “Jira” option in the dropdown menu.
Once you've chosen to connect Jira, Notion will prompt you for access credentials to link the two apps. You will need to grant authorization in a designated pop-up window.

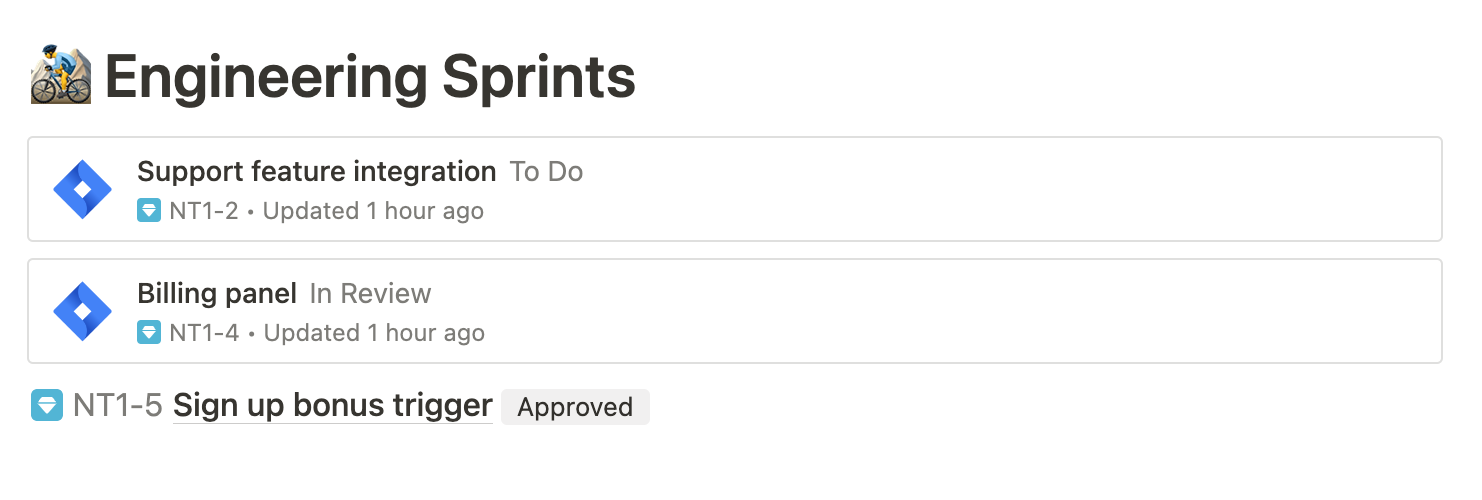
After you have connected your account, you can embed any ticket from Jira by copying and pasting the ticket’s link and pasting it inside Notion. The individual Jira tickets will show up in your Notion document (see the screenshot below)
Please note: Embedding entire Kanban boards or Jira dashboard views does not work with this method. When pasting a link to a Kanban board, Notion pops up an ‘unrecognizable URL’ error for the embed link.

What if you need to customize and tailor what data to share from your Jira account without setting up integrations? Method 2 is the perfect solution for you, check it out below.
Method 2: Use Plus to embed Jira Tickets in Notion
Get the most out of Notion and Jira with Plus! Our Chrome extension transforms data from any app into a live Snapshot, that's updated in real-time. Here’s what you need to get started.
Before we begin, make sure to set up your Plus account & install the extension.
To use Plus, install the Chrome extension by clicking here. After installation, head over to your Jira board and click on the Plus icon in the top-right corner of your browser.
Step 1: Take a Snapshot with Plus
In this example, I’d like to capture and share a specific view from my Jira Kanban board. I want to share the tickets under the 'in review' header, instead of my entire Jira board. Here’s how you’ll do it.
First, you need to click on the Plus extension on your browser, which lets you instantly capture any area of your screen with just a few clicks. To get started, click the “Take Snapshot” button.
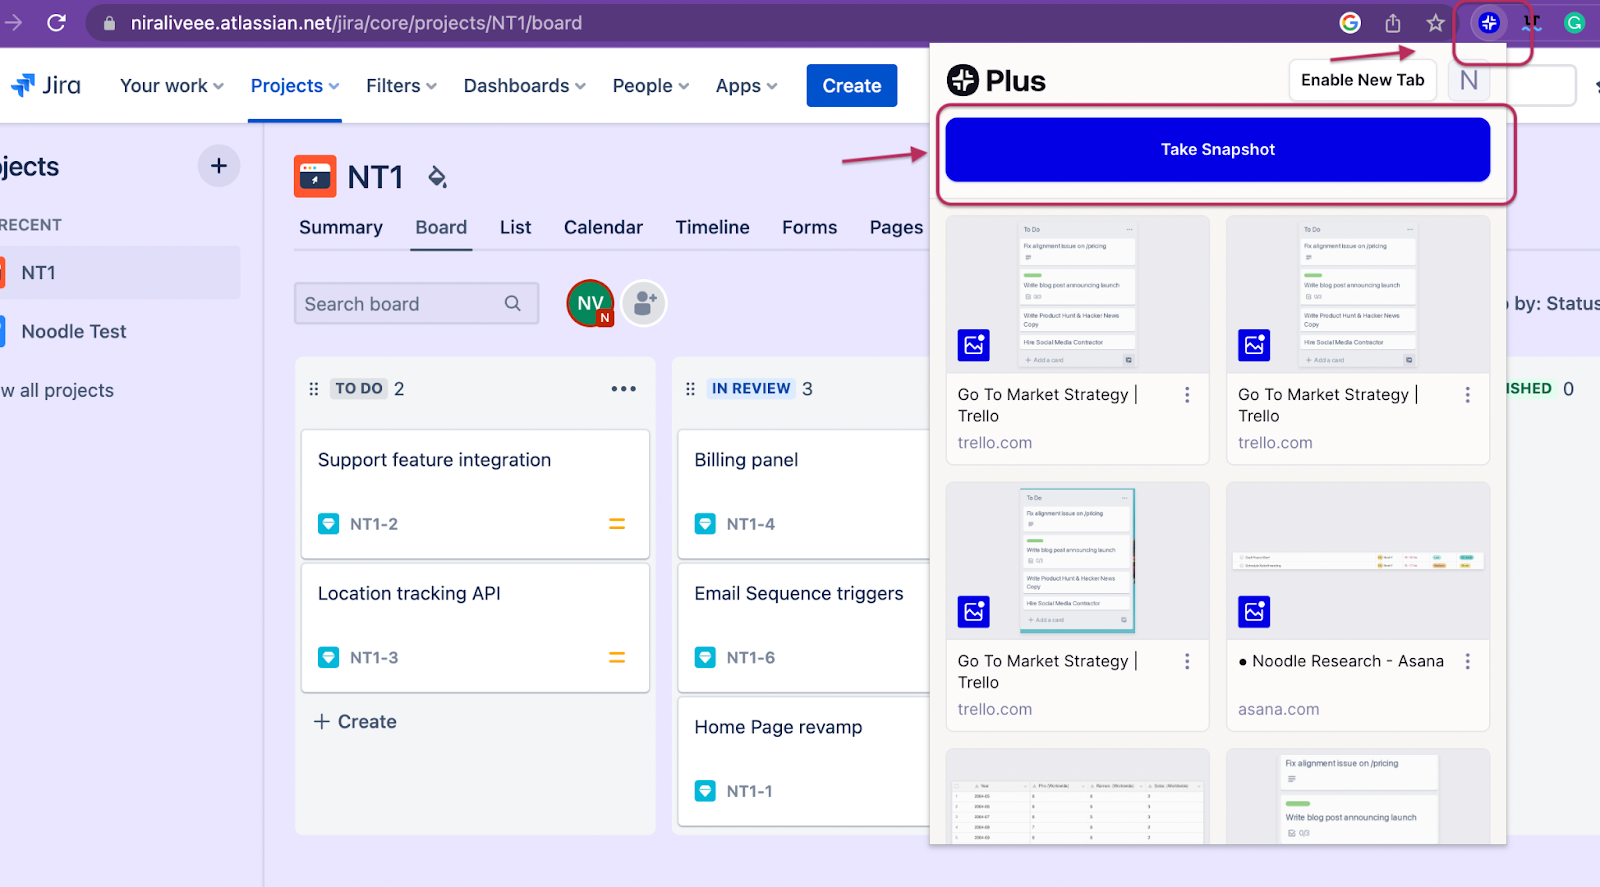
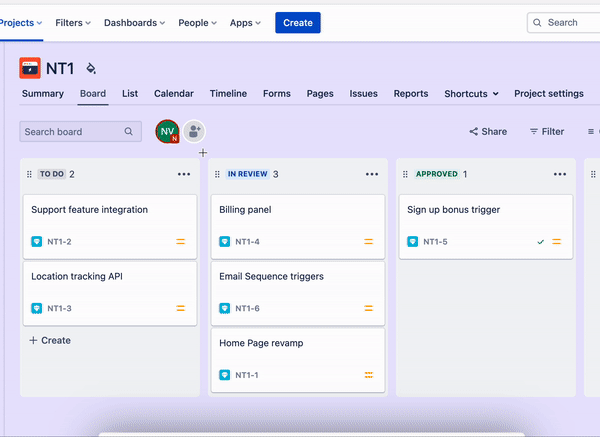
It's extremely simple to take Snapshots —draw a box around the area you’d like to capture. In this case, I’ll select only one header of cards from my Jira board and take a Snapshot of the details.
When the Snapshot is successful, an onscreen window will let you know it worked. Click on the button that says copy the link to the clipboard.
It’s just like taking regular screenshots from your computer, except these screenshots are live and updated in real time.
Check out the GIF below for a visual guide.
Step 2: Copy the URL of your Snapshot and paste it into Notion
Once you've captured a live Snapshot of your customized Jira tickets, paste the URL inside your Notion document.
Your Snapshot will now appear as a live view of Jira within Notion—feel free to adjust it to fit your layout needs.
If you want to embed Airtable into Notion next, here’s a step-by-step guide.
Conclusion
Now that you know how easy it is to embed Jira into Notion, there's no excuse not to get started. With this powerful combination of tools at your disposal, staying organized has never been easier.
There are many ways to embed Jira tickets in Notion so that you can view and edit your data without ever having to leave your workspace. The method that you choose will depend on your needs and preferences.
Plus makes bridging these two platforms simple and efficient. With no coding knowledge or technical expertise required, this integration is seamless and quick.
Get a clear overview of your top-priority tickets with Plus' custom views for Jira. Customized live snapshots ensure viewers are not overwhelmed by an entire board. It also helps teams showcase exactly what is important right now.
With Plus, you can create the perfect dashboard for your data. Don't waste time on complex integrations—sign up today and make custom views a reality!